FactBox

Monday 28 November 2011

The thing in the loft

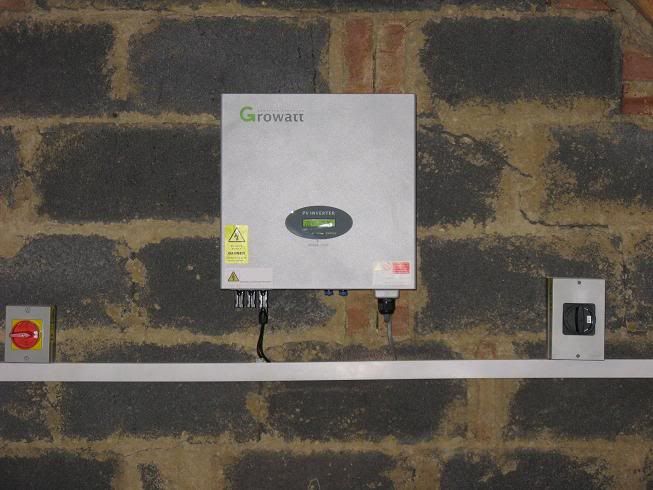
By way of finishing the description of the system, I’d thought I’d better include a photo of the inverter which is mounted in the loft. This is Growatt 4400 unit, capable of handling about 4400W of power generation shared over three different array circuits. Whilst my current system is wired as a single daisy-chain of panels, it is nice to know that should I need to, I can split the array, or add further arrays in the future. This is of particular relevance should I decide to extend the house and/or have a loft conversion requiring a large dormer on the back of the house.
The unit itself is in the loft for a few reasons – it is out of the way, it is nice and cold (which improves efficiency) and it’s at the right end of the repurposed 13amp feed from the fuse board.
In all it’s a fairly uninspiring looking device, but it is heavy (about 20kg) and I suspect it’s just a huge transformer (or transformer equivalent) and a giant heatsink. According to the technical data, it is 98% efficient and has a power consumption of less than 5watts once output from the panels drops (i.e. at night).
One nice touch is the display. The two line LCD cycles through a variety of useful information input/output voltage, power, kWh per day etc. which is most informative. In order to make reading easier you simply knock gently on the case and the display become backlit for 30 seconds or so.
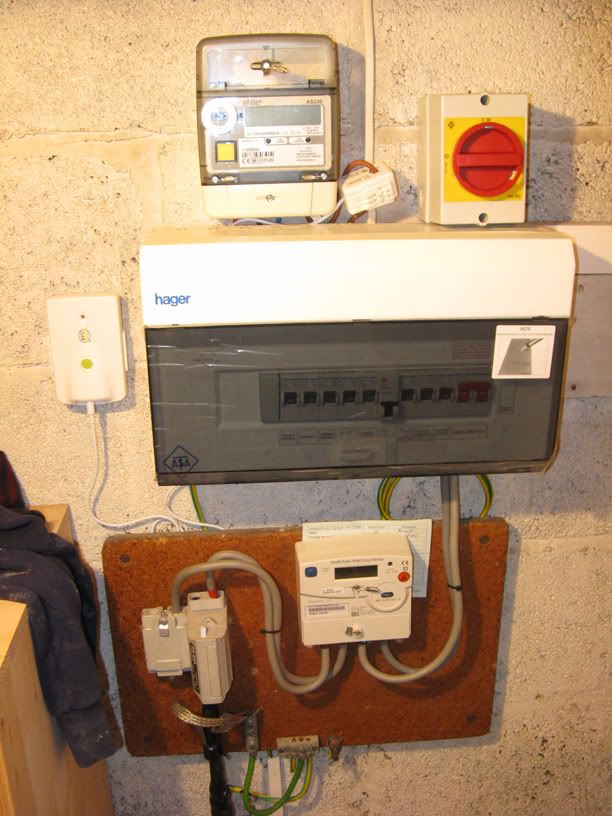
Given the remote location of the inverter, I really don’t expect I’ll be checking on it with any regularity. But that’s where the OWL monitor and the generation meter under the stairs come into their own.
Hopefully by next week I’ll have a few initials statistics to share, so it’ll be interesting to see how the first 7 days have gone.

Friday 25 November 2011

A good day forecast

Today is the first day since the system went live that we have a great weather forecast - clear skies & lots of sun all day. So I'm expecting a record day.

By 0830 it was clear that the forecast was living up to its promise and the system was already pumping out a very healthy 700watts of juice.

In fact, a quick glance under the stairs showed that for the first time that I had observed, the main electric meter was complaining about trying to go backwards. I dont think it does, only that it glows and complains with an error message. This may have occurred before, but I was not around to witness it.

Shortly after, the family started moving about and the illusion was gone - on went the TV, laptop etc. and suddenly we were no longer self-sufficient, but that should all change as the sun increases strength around lunchtime.

Here's hoping I will be recording our best ever generation figures by the end of the day.

Postscript: 4.468 kWh produced today, beating the previous high of 3.377 kWh. Not bad for a nice day at the tail end of November.

Wednesday 23 November 2011

Payback time

There were many reasons why I decided to have the solar panel system installed. But whilst trying not to completely discredit my green credentials, a significant element is the financial story.
For systems installed and registered prior to Dec 12th this year, there is a generous Feed In Tariff (FIT) of 43.1p per unit generated and then additional advantages in terms of electricity usage to offset and revenue from exporting excess power in the summer.
The various companies that I asked to quote for the project all included standard pay back calculations, but frankly these seemed too good to be true and also lacking in practical factors. (In fact it is too good to be true, and why the government if halving the FIT going forward, for once I have the timing just right.)
Having some experience of financial modeling of my own, in the preparation of business cases etc., I decided to design my own payback calcs by way of checking the figures.
The main elements are very simple, but are based around comparing the outlay, return and the potential value of return against what the investment could achieve if left in a safe place. The problem with most calculations I’ve seen is that they:
  1. Do not consider that the investment would earn interest if not spent on solar pv. (Financial folks might start talking about NPV at this point, but since I’m not sure this is the correct term, I will refrain from this). 
  2. Do not consider that the FIT income could be invested on receipt
  3. Do not acknowledge that there is a difference between return on investment and interest on a lump sum, whilst retain the lump sum, which have different levels of utility.
The latter point is very important when looking at the cash flow concerned and determining an AER equivalent for the 25 year period.
So, based on the spreadsheet I have received, I built a very simple payback calculator to determine real payback based on interest lost, cash flow and comparative position vs the lump sum investment.
To simplify the model I’ve rolled the various cumulative effects into a single RPI factor, i.e. panel degradation, electricity cost, FIT payment increase. Overall this worked out at 3.0% annual increase in benefit. To simplify the model I have assume I can obtain a 3% risk free rate of return for both the lump sum and FIT payments. I have chosen to model the cash flow on the FIT payments alone. This was for two reasons: Firstly, I will probably only notice the FIT payments since they represent the bulk of income and secondly, the FIT payments will be ring fenced into a separate nest egg for my kids. Hopefully by the time they are old enough this will be sufficient to make a hole in university fees or mortgage deposit.
The analysis below shows the comparison between cash flow (return - investment) allowing for interest, the lump sum return and the difference.

The quoted payback on the system from the official spreadsheets is said to be, typically, 8 years. However this is the point at which the system cost is recouped. You haven’t at this point made any profit, and you haven’t allowed for interest you would have earned in the mean time.
Allowing for potential return you can see from the model that although you recoup you investment at about 7.5 years, you only match what the lump sum would achieve at 9 years. (The point at which the green line goes positive).
However, overall it’s good news. Over the 25 years, with reasonable reinvestments and a RFRoR of 3%, the initial outlay should create a nest egg of over £58k. This is nearly £38K more than the outlay of £10K would have generated at a 3% p.a. return.
Whilst this sounds like a lot, you need to bear in mind that inflation will significantly reduce the value of £58K in 25 year’s time – however, it should at least be equivalent to £20K in today’s money.
It was this analysis that prompted me to move forward with the project. I think it’s a more fair reflection of the investment return than the calcs from the various vendors. But then that’s just me.

Tuesday 22 November 2011

A little progress

Four days in and the weather's been pretty poor - two days of fog followed by a dank, drizzly day. Still managed to produce a few units of power, but nothing amazing. The grand total for the four days is just 8.0 kWh, but it's a start. 

In the mean time, my MCS certificate arrived my email on Sunday and the necessary forms etc. were sent off Monday by recorded delivery. These were duly received today (Tuesday) is the Royal Mail delivery tracking website is to be believed. 

Quite why it is necessary to have an 8-page form to register ones panels with your electricity supplier is beyond me - especially when they already take money off me every month without any such detail - but it's a necessary evil, so one just moves on.

So hopefully all is coming together nicely. 

On the 'to do' list now are just a few minor things:

(1) chase up the scaffolding, I was hoping it would go early this week

(2) follow up on the warranties for the kit

(3) sort out some savings accounts of the kids - the plan is to put all FIT payments into a nest egg for the kids, so I need to make a few changes here to get more than token interest. This item is less urgent, since I'm not expecting to see any cash for a little while, but I like to be prepared.


Saturday 19 November 2011

Watts at last

So today was the first day of generating real electricity. 

About 8am the OWL meter started to show about 120W - more than the background reading of 85W that seems to persist throughout (presumably the load of the inverter and panels). By 9am things had started to lift up to 500W or so and by 10am we'd seen upwards of 700W on several occasions.

The weather was not ideal - grey cloud clearing later, but from time to time the sun threatened to break through and we topped 1000W a few times. Around lunchtime we hit a mighty 1.2kW briefly before settling into a steady 700-900W for a good hour or so. 

The sky cleared later on, but the power started to wane as the angle and height of the sun changed. And at about 4pm the light was gone. 

Despite the mixed weather, and shadows on the panels from the scaffolding (due to go next week), we managed to produce 3.3kWh today - not bad for mid November, and a start.

Whilst this is hardly going to compete against the national grid, it's made a hole in today's bill, although not enough to export any juice, it all helps.

Ideally, I wouldn't have installed the system at this time of year, but needs must with the tariff deadline approaching. So anything that gets produced between now and spring is a bonus. 

The next week or so will be interesting to track, as well as trying to understand the impact of the system drain at idle.

Friday 18 November 2011

Installation - day 9

Day 9 - Nov 18th 2011

So finally, finally, after much messing about the inverter arrived. A great big hulking Growatt rated at 4400 watts. Considerably more than required, but we've gone beyond that time for complaining. 

It was duly installed in about an hour - even that did not go quite to plan as the connectors had to be changed - and within a few minutes of turning on, we were generating power for the first time. It was about 3pm at this time, about the same time that the sun moves round off the roof, but for a glorious 15 minutes we were generating electricity for the first time. 

OK, it was only 150 watts or so in the late autumn sunshine, but it's a start. Here's to the weather for tomorrow - forecast cloudy with some breaks - to really see the system do its thing.

It's been a long install, more hassle than it should have been, but hopefully we're through the worst - only the scaffolding to go now and we'll be almost back to normal.

Installation - day 8

Day 8: Thursday Nov 17th
A few more phone calls. The inverter was expected to arrive between 3pm and 5pm. If possible then the inverter might get installed today, if not tomorrow. I’m not holding my breath.
Postscript - the inverter will not be available today. Apparently the truck should arrive overnight and be sat outside the wholesaler at 0730 tomorrow morning.
As will be the installers, after which I will get a phonecall. Apparently.
Hopefully good news tomorrow, but that's been a common theme of late.

Installation - day 7

Day 7: Wednesday Nov 16th
Many phone calls.  No inverter. Apparently it was part of a consignment of 4000 inverters coming in from Germany – the good news is that they’d left, the bad news is no one knew where they were. On an aside that’s about £4m worth of stock – there’s some serious money in this solar panel business.
I knew I was taking a risk in proceeding without it, but with the tariff deadline only a month away, I wanted the best chance possible of making the deadline - if there was a problem with the application, I wanted a good chance to fix it on time.

Installation - day 5

Day 5: Monday Nov 14th
10 am and the guys reappeared, suitably armed with extra roof tiles and a rail joiner. Two and a bit hours later the job was done. Rubbish cleaned up, rail complete, panel;s installed, wiring connected.
It had been a long haul but we we’re done (all bar the inverter, due on Wednesday). It looks neat, tidy and quite stylish on the roof – I’ll get a better picture once the scaffoldings gone. However, I’d be more impressed if it was working, since after all this was a not inconsiderable part of the reasoning for having it installed in the first place.
Finally - 14 panels in place!


Installation - day 4

Day 4: Sunday, Nov 13th
Today the 8am start wasn’t. Again. In fact, it was more like 9am. I can understand that, and I can handle it, but why tell me 8am.
They arrived with a new piece of rail. All 5 metres of it. Only, it wasn’t the same as the one already in use, wasn’t compatible with the roof hooks and didn’t match the rail joiners. Not a good start to the day.
They started work on the second rail, installed it, and hung the first panel, then the second, then the third. Then it all went quiet and there were some raised voices. It didn’t seem  to measure out correctly.
The original problem, as I later found out, was one of simple mathematics. If you have 7 panels that are 1000mm wide, and between each pair and at each end you need to allow 20mm, how long should each run of mounting rail be?
The answer is = 7 * 1000 + 8 * 20 = 7160mm , so allowing for a bit of waste after fitting, you could get away with 7250mm for each run. Since we required four runs you need approximately 29m worth of rail. The supplier had send 31m, so there was plenty.
Unfortunately the roofers obviously didn’t study at the same school as me. They had worked it out at 8400mm (8.4m per run), which is longer than the roof and this had caused the confusion of yesterday.
Now it had caused the panels to go up in the wrong locations, and the cuts in the wrong places on the rail.
Down came the panels, out came the hacksaw, and off we go again.
Four panels re-fitted and a visual check from below. They were clearly not straight (right hand up a bit). Panels removed and refitted - a whole morning gone a little progress to show for it.
Finally, we started to make progress. By 4pm we had the top line of 7 panels up, and three on the bottom line. But there was still more work to do to finish the job. Extra joiners were required along with quite a few roof tiles to replace some broken in the installation. It would need Monday morning to finish off, and they’d need to source the bits first. We were running into Monday.

Wednesday 16 November 2011

Installation - day 3

Day 3: Saturday, Nov 12th
Expecting the roofer and sparks at 8am as agreed. They turn up about 0845 and start to get things moving.
I’ve spent the last hour or so getting ready – cupboard under the stairs cleared and access through the house protected with sheeting.
The chimney starts to get a right battering from the off, but it seems under control and the wiring start to come together under the stairs.
I’m lucky in that I’ve been able to offset the cost of having the chimney taken down against some of the wiring. In a rare moment of fortune, when the house was rewired a few years back I had two circuits run to the loft – 1 for light and 1 for power. The latter, frankly has never been used, so this will be repurposed as the feed from the solar system to the fusebox. The layout of the house would have meant considerable work and mess otherwise (channeling out, capping, making good etc.) so this has saved time, money and mess. This is a great advantage. Should I want power up there in the future I can use an extension lead from the landing, which to my mind is no great hardship for the few times it may occur.
So the cupboard under the stairs now also contains the isolator, an additional meter and an OWL CM160 transmitter. The latter used to provide easy measurement of power production. The inverter and other isolators are mounted in the loft on the other end of the original circuit.

Whilst all this was going on the roofers were busy trying to fit the first mounting rail on the roof and make good the whole that used to be the chimney. It was not rapid progress. The roof hooks went in easy enough, but the spacing was a problem – one that was to continue for the next day as well. By their calculations there wasn’t enough rail provided by the wholesaler – I shall explain that later.
By 3pm they’d made the roof water tight (sort of), fitted the first rail, and the panels had been tested at ground level with a meter. It felt like progress. A bit.
They would be back tomorrow morning at 8am, with more rail and would finish tomorrow.
End of day photo:

Installation - day 2

Day 2: Friday, Nov 11th.
Got the whole family up early for when the scaffolders arrived. (Not too much of a stretch for me since I’m up early, but the kids are not such an easy proposition).
No scaffolders by 0830. Various phonecalls later. They’ll be there at 10, 10:30, an hour, a while etc.
The roofers showed up on time, but couldn’t do anything. So they headed down the local cafĂ© for a full English.
12:30 the scaffolders show up. The roofers in the mean time have gone back home – they won’t be able to start in time to complete the work today.
2 hours or so we have scaffolding. Finally some signs of progress.
An hour or so later the equipment arrives from the solar wholesaler. It’s a good job I’m there – someone has to help with the unloading and sign for the equipment.
The panels are not quite as expected, instead of Yingli 240W panel I’ve got Q-cell 245W panels. Some research required to see if that’s ok.
Scaffolding in place:

Panels in the garage:


Box of bits (but no inverter):


Installation pains

Day 1: Thursday, Nov 10th
I took today off work, the plan was to be around to mind the scaffolders. Whilst I probably didn’t need to be there, at least it gives my wife one less thing to manage (the kids keep her busy) and I can burn up a couple of vacation days too,
Mid-morning and no signs of activity when the phone went. Apparently inverters are in short supply so my installation is going back a week. I was not a happy bunny. I pointed out that I had taken time off, so why didn’t they run the install anyway and fit the inverter when available?
A few phone calls later and the plan was confirmed. The scaffolders would arrive at 8am tomorrow, the roofers a few hours later to start work on the chimney. Saturday/Sunday would finish the panel and the inverter would follow – probably next Wednesday.
I make best use of the time to make some space in the garage and play with the kids.

Tuesday 15 November 2011

Site & system details

So the basic site details are as follows:

Pretty standard 3-bed detached house facing almost due north, the rear roof is approximately 7.7m by 4m, rectangular in nature and faces a little east of due south. The roof has a fairly steep pitch (estimated at 45 degrees, but it may by a little more).

We're located just inside the M25 on the outskirts of London, in the South West corner of Hertfordshire, not too far from Watford (probably the most well known place in the vicinity).

The proposed system is a 14 x 245w panels, creating a peak output of just under 3.5kW.

In the beginning

For some months I've been seriously looking into getting a solar PV system installed at home. So a few weeks back I took the plunge and started to get a few quotes. With the recent proposed changes to the feed in tariff (FIT) I seemed to have caught things just right regarding timing. I am not normally so lucky.

At the outset I have to say I was somewhat sceptical. The entire deal seemed too good to be true. I ran the numbers a few times, played with some assumptions, found a few friends at work in the same position and still the result came back. So, I pushed ahead to make the most of the higher tariff before the December 12th cutoff and fingers crossed.

Inspired by this blog I thought I'd document some of the progress, thoughts and results as I go along.

As of right now, I am most of the way through the installation process, hopefully the last component (the inverter) will be available for installation tomorrow (Wed) and we should generate our first unit on Thursday this week.

There's quite a story to add to the install, some photos, some calculations and more than one or two spreadsheet to share, I shall endeavour to introduce these over the coming week as a way to catch up.